(July 2021)
The Monkey Island (TM) PC-Speaker music player

- I modified DOSBox to extract the frequency/delay value pairs of the Monkey Island PC-Speaker songs.
- I then used Huffman compression to squeeze all music inside an ATtiny85 (512 bytes of RAM, 8 KB of flash)
- Once I managed that, I then created a small circuit with a speaker - to play the music...
- ...as a gift for my nieces and nephews; whom I'll see next week after more than a year's isolation (COVID)!
Yes, their uncle is a complete nerd. And he made sure they grew up meeting Guybrush Threepwood :-)
History
If you...
- ...had the good fortune of playing Monkey Island back in 1990 on a PC clone...
- ...while listening to the crappy-yet-magnificent PC-speaker music...
- ...and you also have a tech/nerdy disposition...
...then there's a good chance you will enjoy some of what follows :-)

The adventure begins...
I met Guybrush Threepwood in 1990 - and followed him in his adventures in the Caribbean.
To be clear, I am talking about a game. But not just any game... There are many things one can say about Monkey Island - one of them, is that it is included in the list of the best games ever (if you haven't played it, you should seriously consider trying it out).
But the most important thing about it... is that in so many ways, it is Art.
Of the best kind.
And part of that art, was the PC-speaker music!
Naturally therefore, an old nerd eventually feels the need to dig that treasure out...
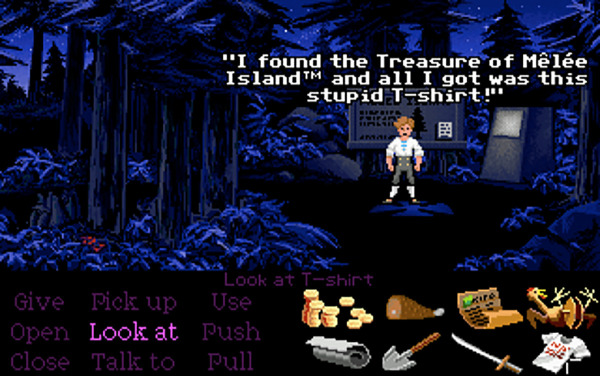
Who knows, we may even get a T-shirt!
DOSBox
These days, even our phones are supercomputers. At least they feel that way, to a guy who grew up with a ZX Spectrum.
It is therefore quite easy, from a CPU-requirements standpoint, to emulate old machines.
DOSBox is one of the programs that do just that: it emulates DOS machines almost perfectly, allowing old-timers like me to relive their DOS days - and use the data from the original diskette of Monkey Island :-)
Since DOSBox is open-source, the adventure begun by hunting for the frequency-driving code of the PC Speaker. It was relatively easy: in good old PCs, the speaker was driven by the Programmable Interval Timer (PIT) - so after slightly modifying DOSBox's timer-handling code...
//
// Meanwhile...
//
// Inside src/hardware/timer.cpp
//
//
            case 0x02:                      /* Timer hooked to PC-Speaker */
                    PCSPEAKER_SetCounter(p->cntr,p->mode);

+                   // Tell me the secrets of Monkey Island!
+                   printf("%.3g Hz @ %u\n",PIT_TICK_RATE/(double)p->cntr, PIC_Ticks);

                    break;
            default:
                    LOG(LOG_PIT,LOG_ERROR)("PIT:Illegal timer selected for writing");
...I made DOSBox print out what frequency it is currently forcing through the PC-Screamer.
That also required configuring my modified DOSBox to sing appropriately...
# In dosbox.conf

sb16=none
...
gus=false
...
pcspeaker=true
And after launching my mutated DOSBox - while redirecting standard output - this sort of data came out:
...
1.19e+06 Hz @ 15179
1.19e+06 Hz @ 15184
1.19e+06 Hz @ 15188
1.19e+06 Hz @ 15192
1.19e+06 Hz @ 15196
1.19e+06 Hz @ 15201
1.19e+06 Hz @ 15205
989 Hz @ 15209
989 Hz @ 15213
989 Hz @ 15218
784 Hz @ 15222
784 Hz @ 15226
784 Hz @ 15230
784 Hz @ 15234
658 Hz @ 15239
658 Hz @ 15243
658 Hz @ 15247
658 Hz @ 15251
494 Hz @ 15256
494 Hz @ 15260
494 Hz @ 15264
494 Hz @ 15268
392 Hz @ 15272
392 Hz @ 15277
392 Hz @ 15281
329 Hz @ 15285
329 Hz @ 15289
329 Hz @ 15294
329 Hz @ 15298
165 Hz @ 15302
165 Hz @ 15306
165 Hz @ 15310
...
- The 1.19MHz means silence.
- The rest, is pure melody!
And since it is time-stamped melody, one can easily extract each note's duration.
So I quickly hacked some Python to turn this digital Sheet Music (from the redirected file notes) into some.wav file...
#!/usr/bin/env python
import os

FREQ = 22050

def emitSilence(f, ms):
    print("Silence for", ms, "ms")
    ms = 1 if ms > 5000 else ms
    f.write(''.join([chr(0)]*int(22050*ms/1000)))

def emitFreq(f, freq, ms):
    print("Emitting", freq, "HZ for", ms, "ms")
    samples = int(FREQ/freq)
    samples_on = int(samples/2)
    data = [chr(255)]*samples_on
    data += [chr(0)]*(samples - samples_on)
    time_of_one_period = 1000. * samples/FREQ
    while ms > 0:
        f.write(''.join(data))
        ms -= time_of_one_period

def main():
    f = open("some.raw", "wb")
    freq, tick = 0, 0
    oldFreq, oldTick = -1, 0
    for line in open("notes"):
        freq, tick = line.split('Hz @ ')
        tick = int(tick.strip())
        freq = int(float(freq))
        if freq != oldFreq:
            ms = tick-oldTick
            if oldFreq in (-1, 1190000):
                print("Silence", ms)
                emitSilence(f, ms)
            else:
                print("Freq", oldFreq, ms)
                emitFreq(f, oldFreq, ms)
            oldTick = tick
        oldFreq = freq
    f.close()
    os.system("sox -r 22050 -e unsigned -b 8 -c 1 some.raw some.wav")
    os.unlink("some.raw")

if __name__ == "__main__":
    main()
It worked!
I could hear the glorious beeps - rendered from my own code.
I proceeded to chop the notes down into individual songs... (which was rather easy, thanks to prolonged silence periods between them)
It was now time to build The Player (TM).
Step 1: The target
All of this won't be fun enough, unless we reproduce the original setup - i.e. slow machines, crappy speakers, etc.
I decided to push things to the limit (if you ask why, you are reading the wrong blog).
My target: to create a standalone player based on the ATtiny85.
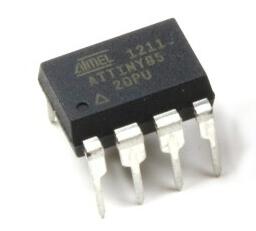
That is, a microcontroller with...
- 512 bytes of RAM
- ...and 8 KB of Flash.
That's all: 8.5KB of space - total.
Even less room to work with than on my ZX Spectrum :-)
You young people and your gigabytes!
We don't need ya.
Step 2: Fit, please fit
We obviously can't fit the song data in 512 bytes of RAM.
Heck, the notes alone (not the delays) ...are more than 2.6K 16-bit values!
$ head frequencies_0.data
989
784
658
494
392
329
165
65535
329
65535

$ wc -l frequencies_*
 1360 frequencies_0.data
  211 frequencies_1.data
  706 frequencies_2.data
  376 frequencies_3.data
 2653 total
Hmm.
Let's start by moving the data into the microcontroller's Flash space - the same
place where our code will also reside.
A bit of Python will convert the notes and delays into nice const-ant C arrays...
const unsigned short frequencies[] PROGMEM = {
    989,
    784,
    ...
};
...annotated with PROGMEM - telling the cross-compiler to move everything into Flash space.
We compile, link... aaaand...
Nope.
Not even close to fitting.
Time to think about compression.
Step 3: Huffman coding
I've been a SW engineer for more than 3 decades now - I am no stranger to custom compression. In fact, I owe my understanding of pointers to the compression code I wrote in C in the 2nd semester of my engineering education, back in 1990 - while implementing the marvel (to my 18-year-old eyes) of Huffman coding.
What are Huffman codes, you ask? You can read the link above for details, but the idea is really simple:
- if we use less bits for our most frequent data
- and use more bits for our less frequent data
...then overall, we need a lot less bits.
In our case, for example, we want to compress 16-bit frequency values. Assume that our music data indicate that we have tons of 989Hz frequencies in our songs. Well then, we can represent them with just one bit: '0'. Everything else will be represented with a prefix of '1' first, but if we have enough 989Hz in our data, we will compress each one of them to just one bit - i.e. 1/16th of their original space! We will therefore gain significant savings (more than enough to compensate for the "loss" due to the growth of the others).
How do you create the optimal codes for your inputs? Quite easily, with a heap-based algorithm. I could redo the code myself from scratch, as I did 30 years ago - but I am, erm, wiser now. Googling didn't reveal a Huffman compressor for embedded spaces, but I can always re-use code in higher-level languages - to compress the song data to Huffman codes ; and then only code myself the decoder in C/C++ (for real-time reproduction inside the ATtiny85).
After a bit of Googling for Python code implementing Huffman coding, I ended up on this piece of Rosetta code. Python comes with a heap implementation out of the box, so this is nice and terse.
But... the code is actually not as nice as it could be.
I proceeded to add type specs - and that immediately made things much clearer.
Compare this...
def encode(symb2freq):
    """Huffman encode the given dict mapping symbols to weights"""
    heap = [[wt, [sym, ""]] for sym, wt in symb2freq.items()]
    heapify(heap)
    while len(heap) > 1:
        lo = heappop(heap)
        hi = heappop(heap)
        for pair in lo[1:]:
            pair[1] = '0' + pair[1]
        for pair in hi[1:]:
            pair[1] = '1' + pair[1]
        heappush(heap, [lo[0] + hi[0]] + lo[1:] + hi[1:])
    return sorted(heappop(heap)[1:], key=lambda p: (len(p[-1]), p))
...to this:
# The types used by the Huffman compression engine.
Symbol = int          # Our input data are just bytes
Weight = int          # We count their frequencies via Counter
BinaryString = str    # ...and encoded them into a binary string
HuffmanTable = List[Tuple[Symbol, BinaryString]]  # via this.

# Types needed during encoding
HeapEntry = Tuple[Weight, HuffmanTable]
Heap = List[HeapEntry]

# Let's make a Huffman table...
def make_huffman_table(
        symbol_to_weight: Dict[Symbol, Weight]) -> HuffmanTable:
    """
    From a dict of symbols to weights, make a Huffman table.
    Since our symbols are integers, the end result is a table of
    (integer, binary string to use for this integer).
    """
    heap = [
        (wt, [(sym, "")])
        for sym, wt in symbol_to_weight.items()]  # type: Heap
    heapify(heap)
    while len(heap) > 1:
        lo_weight, lo_entries = heappop(heap)
        hi_weight, hi_entries = heappop(heap)
        new_lo_entries = [
            (symbol, '0' + binary_string)
            for symbol, binary_string in lo_entries]
        new_hi_entries = [
            (symbol, '1' + binary_string)
            for symbol, binary_string in hi_entries]
        heappush(
            heap,
            (lo_weight + hi_weight, new_lo_entries + new_hi_entries))
    _, huffman_data = heappop(heap)
    return sorted(huffman_data, key=lambda p: (p[0], len(p[-1])))
I love Python code. I really do.
But I have to state it out loud: type specs really, really help. A lot.
IMHO, this is the most important change in Python 3.
Comments don't hurt, either.
As shown above, I also modified the code to remove the list mutations. Why not create the new lists on the spot? We can afford to, nowadays. This also makes the code "properly" typed - previously, the list contained two different types. It now contains Tuples, i.e. pairs of things.
We get brownie points for improving the code's functional-style, too.
To make it perfect, I also improved the code until it passed Flake8, Pylint and Mypy checks.
Static Analysis for the win.
Finally, I added the simplest possible test - i.e. I created 5000 random data inputs, and performed encode-decode round-trips (to make sure the code re-creates whatever it started with). That easily raised the coverage to 100%.
def test_round_trips() -> None:
    import random
    TESTS = 5000
    data = [
        10 if random.randint(0, 10) < 7
        else random.randint(0, 65536)
        for i in range(TESTS)]
    huffman_table, encoded_bitstream = encode(data)
    decoded_data = decode(huffman_table, encoded_bitstream)
    print("[-] Compression ratio: %5.2f%%\n" % (
        100.*len(encoded_bitstream) / (TESTS*16)))
    assert data == decoded_data
Notice that the test deliberately skews the distribution of values - a set of completely random inputs, where each value is just as likely as the others, obviously doesn't compress at all.
OK - after all that, I could really trust the Huffman encoder.
I could now proceed to unleash the power of Huffman coding on my extracted song data...
$ ./encode_huffman.py
[-] Reading frequencies_0.data
[-] Reading frequencies_1.data
[-] Reading frequencies_2.data
[-] Reading frequencies_3.data
[-] Creating Huffman table for all frequencies data...
[-] Huffman encoding for frequencies_0.data: 28.9%
[-] Huffman encoding for frequencies_1.data: 34.2%
[-] Huffman encoding for frequencies_2.data: 26.7%
[-] Huffman encoding for frequencies_3.data: 29.4%
[-] Reading delay_0.data
[-] Reading delay_1.data
[-] Reading delay_2.data
[-] Reading delay_3.data
[-] Creating Huffman table for all delay data...
[-] Huffman encoding for delay_0.data: 30.0%
[-] Huffman encoding for delay_1.data: 29.2%
[-] Huffman encoding for delay_2.data: 31.5%
[-] Huffman encoding for delay_3.data: 36.6%

Down to ~30%! Victory...
Excellent! We went down to ~30% of our original space.
I then placed the compressed binary strings as a series of bytes into const-ant, PROGMEM arrays...
...and the cross-compiler reported that it all fit in our tiny 8KB of Flash.
Step 4: Encoding (the Huffman table)
But - wait a second.
Huffman-encoded data mean nothing without the corresponding Huffman tables.
I needed to store those as well...
So I tried...
...aaaaand I am out of space again.
Hmm....
Our Huffman table, contains information like this - about each input symbol (i.e. each frequency value):
{    -1 /* silence */, 0, 0 },
...
{
    783 /* frequency in Hz */, 3 /* length in bits */,
         0x80 /* the first 3 bits, i.e. '100' */ },
{
    989 /* frequency in Hz */, 5 /* length in bits */,
         0xD0 /* the first 5 bits, i.e. '11010' */ },
...
Let's apply the brute-force-i-am-an-idiot method:
- First of all, instead of storing 16 bits per frequency, we can store their deltas (in the example above, instead of storing 989, store 989-783). I sort the Huffman table when I create it, so it turns out that the deltas always fit in a single byte. That means we win one byte of space for each entry.
- Then, the length in bits is never larger than 15. So it fits in 4 bits - here's another win of half a byte per entry.
- I can therefore emit a single array of bytes, that goes like this...
[8-bits-of-frequency-delta][4 bits of length][Huffman bits]
[8-bits-of-frequency-delta][4 bits of length][Huffman bits]
[8-bits-of-frequency-delta][4 bits of length][Huffman bits]
...
I proceeded to code this.
You should really get yourself used to this (i.e. code-generation)... It gives you insane powers. Most people, like me, "discover" it on their own. Others are smarter and/or luckier - they meet Lisp macros first, or they read The Pragmatic Programmer.
The "official" name of the practise is model-driven-engineering - though I am abusing the term a bit. In our case, the model is as dumb as they come - our songs' data. But suffice to say that the basic principle here is as old as automation itself: if you can automatically create something, you should. And that applies to your code itself, too!.
I read The Pragmatic Programmer much later in life. It advised many things that I painfully discovered on my own; code-generation; don't copy-paste; don't repeat yourself; etc.
You should probably read that book.
The new code packed the Huffman table tightly...
huffman_table_binary_string = ''
for idx, row in enumerate(huffman_table):
    symbol, binary_string = row
    assert len(binary_string) < 16

    # Encode the symbol
    if idx == 0:
        v = 255 if symbol == -1 else symbol
    else:
        v = symbol-oldSym
        assert 0 < v < 256
    tv = bin(v)[2:]
    while len(tv) < 8:
        tv = '0' + tv
    huffman_table_binary_string += tv
    oldSym = symbol

    # Encode the length
    length_string = bin(len(binary_string))[2:]
    while len(length_string) < 4:
        length_string = '0' + length_string
    huffman_table_binary_string += length_string

    # Finally, add the Huffman code
    huffman_table_binary_string += binary_string
fout.write(', '.join(getHex(huffman_table_binary_string)))
...and the cross-compiler reported that everything - both song data and Huffman table - now fit! :-)
You'll notice in the code above...
- the
delta(symbol - oldSym) computation asserts checking our assumptions hold (e.g. that length always fits in 4 bits)- ...as well as the creation of the 4 bit, 0-left-padded bitstring with the length.
Also notice something else: in general, it is bad form to create
Python strings by just concatenating them together. It is much
faster to append them in a list, and .join them in the end.
But remember - this is a code generator. It doesn't matter how
fast it runs, as long as it doesn't run too slowly (it doesn't -
it finishes in less than one second for all 4 songs I extracted).
OK! Time for the C decoder - that will run in the embedded target...
Step 5: Decoding
You never forget writing C - it's like riding a bike:
#define GET_BITS(N, val)                     \
    do {                                     \
        uint16_t cnt_bits = 0;               \
        while (cnt_bits < N) {               \
            val <<= 1;                       \
            if (current_huffman_mask & *p) { \
                val |= 1;                    \
            }                                \
            cnt_bits++;                      \
            current_huffman_mask >>= 1;      \
            if (!current_huffman_mask) {     \
                p++;                         \
                current_huffman_mask = 0x80; \
            }                                \
        }                                    \
    } while(0)

    const Huffman *p = pHuffmanTable;
    current_huffman_mask = 0x80;
    int16_t value = 0;
    // Get the first symbol (it fits in 8 bits)
    GET_BITS(8, value);
    if (value == 255)
        value = -1;
    while(p < pHuffmanTableEnd) {
        // For each entry in the Huffman table...
        uint16_t bitmask = 0x8000;
        uint8_t cnt = 0;
        // Get the 4 bits indicating the length...
        GET_BITS(4, cnt);
        uint8_t consumed_bits = cnt;
        uint16_t code = 0;
        // ...and get length-bits afterwards...
        GET_BITS(consumed_bits, code);
        // We need to form a bitmask to only compare
        // the bits we care about...
        code <<= (16 - consumed_bits);
        while(--cnt)
            bitmask |= bitmask >> 1;
        if (code == (bits & bitmask)) {
            // Yay! We decoded a symbol.
            fprintf(fp, "%d\n", value == -1 ? 65535 : value);
            fflush(fp);
            loaded_bits -= consumed_bits;
            total_bits -= consumed_bits;
            p = pHuffmanTable;
            break;
        }
        uint8_t delta = 0;
        GET_BITS(8, delta);
        // new symbol is made via adding the delta
        value += delta;
    }
    if (!total_bits)
        break;
For each incoming input, we go through the "magic" bitstream that stores the Huffman table.
And each time, we decode the symbol (which is a delta-encoded, ergo value+=delta),
then read the 4 bits that tell us how many bits follow, and finally,
we read those bits - and compare with the head of our bitstream.
We know that we don't have encoding sequences longer than 15 bits,
so our 16-bits code suffices - so we binary AND it to mask out the
bits we don't care about, and compare what remains: code == (bits & bitMask).
If it matches, we've just decoded a symbol.
The code was first tested on the host (hence the fprintfs):
I used it to decode the data from the Python-generated C-arrays,
and checked if they matched with our original song data.
They did! The Code is Good (TM).
Time to move the code inside a microcontroller... and drive a speaker!
Step 6: Driving a speaker
If you have fun fooling around with electronics - as I do - you probably play a lot with microcontrollers. One of the first things you learn, is that these tiny beasts (from the ATtiny all the way to the ESP32) will suffer from brown-outs if you try to drive too much current from them.
In plain terms: Yes, you can easily create a frequency in a microcontroller by toggling a GPIO pin at appropriate times. But you can't hook it to a speaker and expect it to work.
Let's say your speaker is an 8 Ohms one. If you just connect it to your 5V microcontroller's GPIO output, you expect that pin to drive 5000mV / 8Ohm = 625mA. Good luck with that!
No, you need to drive the speaker. And yes, you could use a ready-made chip that does this job, like the LM386 - but where's the fun in that?
No - we will use A SINGLE TRANSISTOR.
Because we can.
It says so in the Internet, so it must be true!
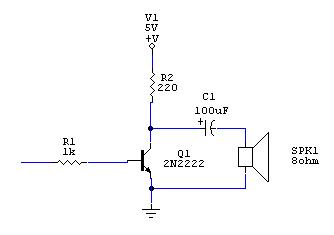
Let's drive a speaker
Even though it was part of my engineering curriculum 30 years ago, you really shouldn't trust me on anything electronics-related. Having said that, my take on that circuit is...
- We don't want to drive the transistor to saturation (because the sound will get distorted).
- So we pick a moderate 1K value - the base current keeps the transistor more or less in the linear region.
- We also don't want to drive DC currents to our speaker (we don't want to blow it up!)
- Ergo, we need a cap. 100uF electrolytics are apparently a good match for this task - and thankfully, I had some.
- Finally, even though it is driven from our power supply and not from a pin of our micro, we still don't want too much current through our 8 Ohm speaker; ergo, the 220 Ohms resistor.
All of this is crude, and needs more looking up of datasheets and far more detailed computations.
But... did I mention I am doing this for fun? :-)
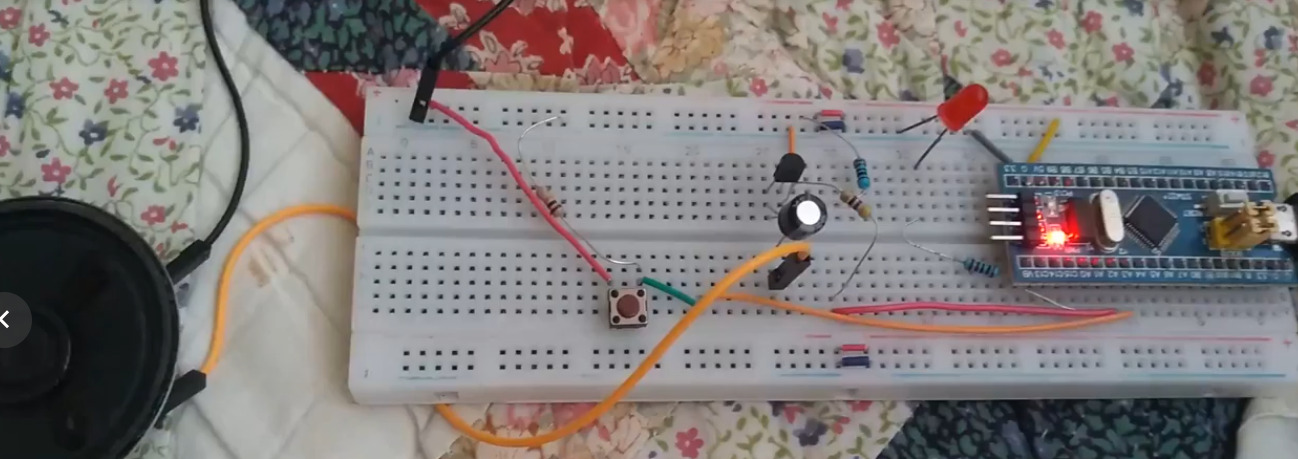
So I moved to the next step: assembling everything on a breadboard, and started testing with a BluePill: a 1.5$ Beast...
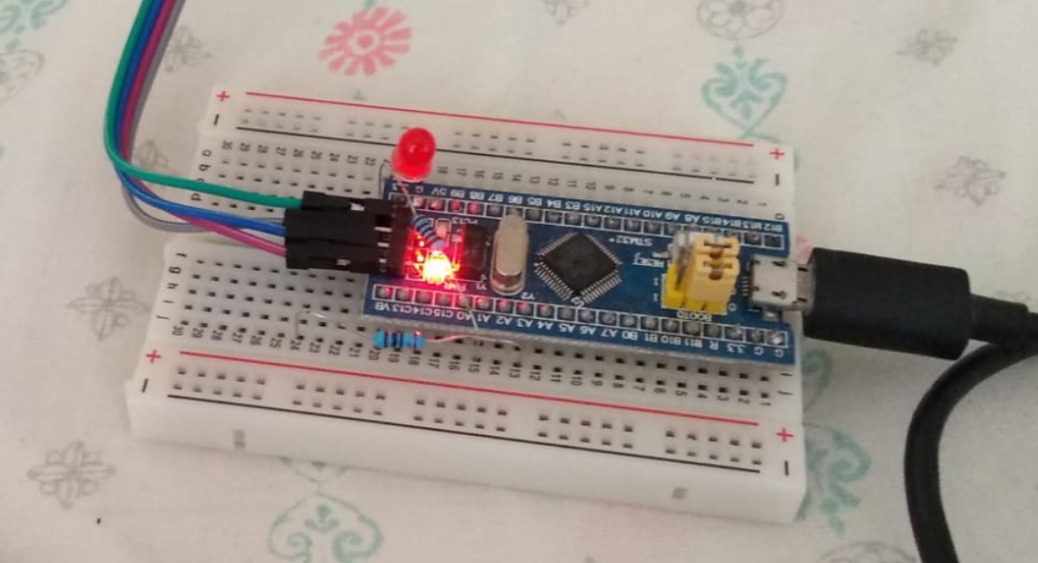
Ready, player one
...with tons of horsepower - I used it recently to do a real-time Mandelbrot zoom :-).
OK, it can draw... but can it sing?
I used a state machine to toggle the single GPIO pin - that drives the transistor's base at the song's frequencies:
// in the main loop:

unsigned long currentMicros = micros();
int passedMicros = currentMicros-previousMicros;

switch(state) {
case Silence:
    silenceMicrosRemaining -= passedMicros;
    if (silenceMicrosRemaining < 0) {
        updateState();
    }
    break;
case PlayingON:
    onMicrosRemaining -= passedMicros;
    if (onMicrosRemaining < 0) {
        onMicrosRemaining = onMicros;
        state = PlayingOFF;
        digitalWrite(SPEAKER_PIN, LOW);
        digitalWrite(LED_PIN, LOW);
    }
    break;
case PlayingOFF:
    offMicrosRemaining -= passedMicros;
    if (offMicrosRemaining < 0) {
        offMicrosRemaining = offMicros;
        if (!periodsRemaining) {
            updateState();
        } else {
            periodsRemaining--;
            state = PlayingON;
            digitalWrite(SPEAKER_PIN, HIGH);
            digitalWrite(LED_PIN, HIGH);
        }
    }
}
previousMicros = currentMicros;
Notice that there's no delay here. The code constantly looks at the time, and checks
how much time has passed since the last check. In this way, it can adapt to whatever
speed our microcontroller is running - and it can also do other things (checking a
button, for instance).
As for the logic, it is quite simple: we toggle the pin ON/OFF to emit the frequency we want; and we do so for the number of desired periods, to reach our delay - which we recompute every time we need to emit a new note:
void updateState()
{
    int freq = decode_frequency();
    int durationMS = decode_delay();
    if (freq != -1) {
        int volume = 60;
        periodMicros = 1000000/((long)freq);
        onMicros = periodMicros * volume/100;
        offMicros = periodMicros * (100-volume)/100;
        state = PlayingON;
        onMicrosRemaining = onMicros;
        offMicrosRemaining = offMicros;
        periodsRemaining = ((long)durationMS)*1000L/periodMicros;
        digitalWrite(SPEAKER_PIN, HIGH);
        digitalWrite(LED_PIN, HIGH);
    } else {
        state = Silence;
        silenceMicrosRemaining = ((long)durationMS)*1000L;
        digitalWrite(SPEAKER_PIN, LOW);
        digitalWrite(LED_PIN, LOW);
    }
}
So we make && make upload, and...
...YES! It sings!
I hear the lovely speaker tunes of one of the greatest games ever... just as I did 30 years ago.
And the LED blinks as we move from note to silence and back again. Bonus :-)
I also used a simple button to allow switching from one song to the next. It's pulled-down to GND normally, but when I push the button, the GPIO pin goes high:
if (digitalRead(BUTTON_PIN) == HIGH) {
    if (!buttonIsPressed) {
        buttonIsPressed = true;
        microsWhenButtonWasPressed = currentMicros;
    }
} else {
    if (buttonIsPressed && ((currentMicros-microsWhenButtonWasPressed)>100000L)) {
        if (song == 0xFFFF) {
            song = 0;
            loadSong();
        } else {
            song++;
            if (song >= sizeof(g_Melodies)/sizeof(g_Melodies[0]))
                song = 0xFFFF;
            else
                loadSong();
        }
        buttonIsPressed = false;
    }
}
If you are wondering about the first if inside the else block, it is
there to perform the simplest possible button debouncing - the "just wait" method.
We then loop around the Python-generated global array of the songs.
Step 7: Run, ATtiny85, run!
Next, I switched to my ATtiny85 Makefile - and issued make && make upload again.
I use an Arduino UNO to program my ATtiny85s. In fact, I made a simple board that
"plugs" into it - I believe they are called "hats"? - to ease the process:

ATtiny85 programmer
The code built and uploaded just fine.
So I placed the puny microcontroller on the same breadboard as the BluePill, connected the proper GPIO to the base of the transistor that drives the speaker, and...
Oh no.
It plays... But it can't make it on time! The ATtiny is too slow!
Or rather - to phrase things accurately - my code is not good enough.
Yet.
Step 8: Back to Huffman tables
So I look at my code again.
It really does store the Huffman table very compactly. But it doesn't care at all about the fact that as we decode, we need to loop through each symbol in the table, looking for the one we want to decode.
That's not the Huffman way. Remember what I said above, about how I really learned the way C pointers work when I was implementing Huffman coding? That was because back then, I made an actual tree - with incoming '0's leading down the left subtree, and incoming '1's leading down the right one - until I met a leaf node, i.e. a node that told me: "I decoded Symbol X".
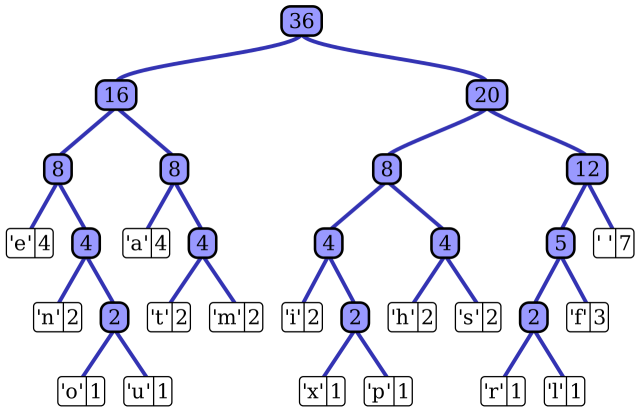
Huffman tree, from Wikipedia
That's optimal - in run-time complexity.
What I did here instead, was extremely optimised for space storage alone - and I paid the price for an O(N) (full scan of the table) for each incoming symbol!
OK - but using trees is not an option. We simply don't have the space for such luxuries - even the simplest serialization (store the left child of slot N at 2xN, and the right child at 2xN+1) would completely exhaust our puny memory space.
I need somehow to fit everything - and yet allow for fast decoding. How?
Hmm...
Wait a second.
Look at the tree above - you traverse it from top to bottom, going left/right depending on whether you see 0/1s in your input bitstring. The number you form with these bits, when you meet your final symbol, is unique - no two symbols can share it, because that would mean they share the same path through the tree!
Now imagine you place all the Huffman symbols in a table - indexed with the integer value of their binary string representation, and having as a value the symbol itself (in our case, the frequency).
If there's no Huffman code pointing in a slot, store a zero.
This will create a very sparsely populated table - but your decoding becomes insanely simple - and fast:
bits <<= 1;
if (current_mask & *pCompressedData)
    bits |= 1;
current_mask >>= 1;
total_bits--;
if (!current_mask) {
    current_mask = 0x80;
    pCompressedData++;
}
if (pHuffmanTable[bits]) {
    fprintf(fp, "%d\n", pHuffmanTable[bits]);
    fflush(fp);
    bits = 1;
    ...
}
All I needed to do, to make this work, was to efficiently store such a sparse table. And what simpler way to do this, than to change this sort of data - containing the zeroes...
0, 739
1, 0
2, 0
3, 989
4, 0
5, 0
6, 0
7, 0
8, 1031
...
...into this - i.e. "ignore the empty slots - just emit the valid entries":
0, 739
3, 989
8, 1031
This structure allows even the tiniest of computer brains to quickly scan for the index; and our final, complete, fast Huffman-decoder is this:
class HuffmanDecoder {
    const uint8_t *_pCompressedData;
    uint16_t _total_bits;
    const Huffman *_pHuffmanTable;

    uint8_t _loaded_bits;
    uint8_t _current_mask;
    uint16_t _bits;
public:
    HuffmanDecoder() {}

    void loadNewData(
        const uint8_t *pCompressedData,
        uint16_t total_bits,
        const Huffman *pHuffmanTable)
    {
        _pCompressedData = pCompressedData;
        _total_bits = total_bits;
        _pHuffmanTable = pHuffmanTable;
        _current_mask = 0x80;
        _bits = 1;
    }

    int decode()
    {
        const Huffman *p = _pHuffmanTable;
        uint16_t current_idx;
        if (!_total_bits)
            return 0x7FFF; // THE END
        while(1) {
            _bits <<= 1;
            if (_current_mask & pgm_read_byte_near(_pCompressedData))
                _bits |= 1;
            _current_mask >>= 1;
            _total_bits--;
            if (!_current_mask) {
                _current_mask = 0x80;
                _pCompressedData++;
            }
            p = _pHuffmanTable;
            while(1) {
                current_idx = pgm_read_word_near(p);
                if (_bits <= current_idx)
                    break; // We either found it, or jumped over the idx
                p += 2;
            }
            if (_bits == current_idx) {
                int value = pgm_read_word_near(++p);
                _bits = 1;
                return value;
            }
        }
    }
}
Notice that it reads from flash-stored data (i.e. PROGMEM-ed data) via
the pgm_read_word_near and pgm_read_byte_near functions - but other
than that, it's as simple as it gets. We keep reading bits to form
the index we will scan for, and then look in the table, checking
indexes as we go. If we overshoot, it means the value is not in the table;
so go read more bits.
To be clear: we still do a "full table" scan, but of a different kind of table,
that doesn't force us to do bit-shifting shenanigans per each entry searched.
Our code - our inner loop - is much simpler now. I measured the
object-code size of the decoding function - via the output of "avr-nm --print-size -t decimal",
and this new decoder was 1/3rd the size of the previous one!
It should therefore run close to 3x faster, on the ATtiny85 - no cache here to meddle the numbers :-)
Also: less code means more room in my flash. Remember, the flash doesn't just store the songs - it must also store my code!
Step 9: The Player (TM), standalone
Time to test - make && make upload, lift the ATtiny85 from the programmer,
put it on the breadboard, and...
The new code worked flawlessly. On the first try.
So I moved to the final step - I placed all components on a small perfboard, and soldered them all together...

The Player (TM)
Here's a video of the final result. Powered by a USB powerbank, we consume on average less than 10mA:
If you made it all the way, I hope you enjoyed reading this - and maybe learned a thing or two.
The entire codebase - using my Python Huffman engine as a submodule - is here.
Have an excellent summer vacation, everyone!
Discuss in Hacker News
Discuss in Reddit
Discuss in Hackaday


| Index | CV | Updated: Sat Oct 21 20:37:23 2023 |
The comments on this website require the use of JavaScript. Perhaps your browser isn't JavaScript capable; or the script is not being run for another reason. If you're interested in reading the comments or leaving a comment behind please try again with a different browser or from a different connection.